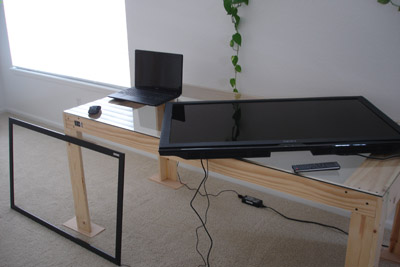
Touch Table Hardware Basics
There are complete table solutions available from various Internet vendors, but it will save you thousands of dollars if you build your own. A multitouch gaming table consists of four basic components, each of which contributes substantially to the overall cost of the table:- A high definition (1920x1080) television with HDMI or VGA/DVI inputs
- A frame or overlay, matching the television size, that detects touches.
- A computer outputting display to the TV and accepting touch input from the frame overlay, usually via USB.
- An enclosure that houses the television, frame overlay, and optionally the computer.
When ordering a frame for playing board game conversions, I recommend a frame supporting at least ten simultaneous touches. This allows five players to have two fingers on the screen at once. The temptation to save quite a bit of money on a cheaper frame should be avoided.
Testing The Basic Setup
 Once you've acquired your TV and touch frame you'll want to test the system before building the enclosure. Lay the TV flat on a table and connect the VGA or HDMI input to a laptop computer or PC. Adjust the TV's settings so that it is displaying output from the computer, and make sure the computer is outputting the TV's native resolution. This is usually going to be 1920x1080. Lay the touch frame on top of the TV and connect its USB to the computer. Install the drivers for the touch frame on the computer. If you've built around a 4K display note that you will need a computer with a more powerful video card and a high bandwidth connection like Display Port.
At this point you should find and launch the calibration tool that came with the frame's driver. The calibration will ask you to touch various points on the screen. The process is very simple. Now you are ready to install a game and test it out. You should also be able to work in Windows 7 or 8 using touches. Sometimes Windows will try to use its own drivers -- it almost always works best to install the drivers that came with the frame. The Windows driver may recognize the frame, but only supply you with one touch point at a time.
Planning Your Enclosure
 The enclosure is basically a box that sits atop four legs. The box holds the TV and the frame, and the legs support the box. It's best to plan early on whether or not you want removable legs or not.
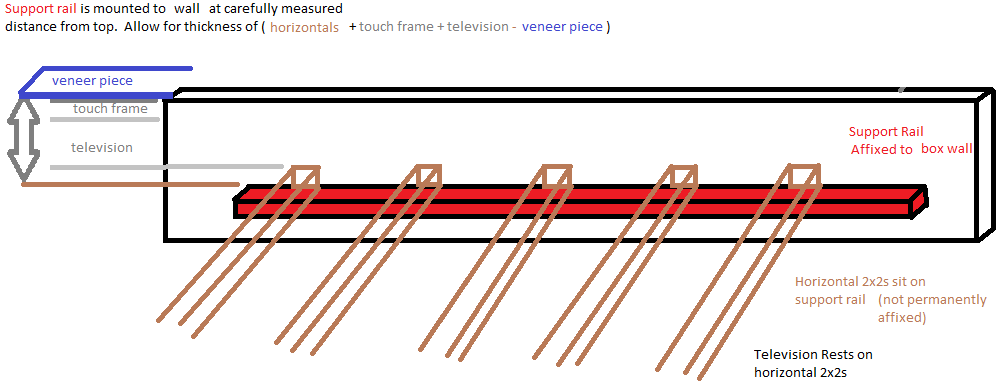
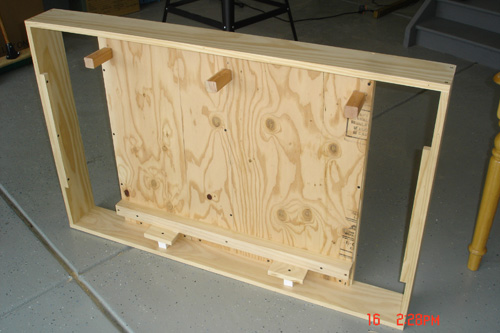
In this picture, the legs are not yet affixed to the box. It's just resting atop them to make sure everything is square and aligned first. You can see the support rail inside the box, attached with five black screws. There is another support rail on the wall opposite it. There will be 2x2 pieces that rest on top of this support rail, and run perpindicular to it. The TV sits atop the floating 2x2s. This may be hard to visualize at first, but keep reading. It will become clear.
Accounting For Thickness of TV and Frame

The formula for where to mount the support rail is simple. The top edge of the support rail should be N inches from the top of the side wall,
where N = (thickness of horizontals + thickness of TV + thickness of touch frame - thickness of veneer piece). Why subtract the thickness of the veneer piece? Because the frame should sick out above the height of the box wall equal to the thickness of the veneer piece, so that the veneer is flush with the same plane as the frame when you are done. This will be illustrted later.
Another view of the box
 Here you can see the box, sans legs, resting flat on the floor. You can see the other interior wall of the box with the other support rail attached with black screws. The extra pieces you see flush with the top of the box are just supplemental support for the veneer pieces which people tend to lean on.
Final Assembly
 After you've decided on how the legs will attach to the box, in this picture you see a table where they were permanently attached using pieces of scrap on the inside. You can also attach pieces to the legs which will run inside the box that can then be drilled through for bolts, giving you removable legs.
You can see here that the flat veneer pieces are attached to all four sides of the table, giving a hand/arm rest for the users. We had to account for the thickness of this piece when placing the support rail, so that the plane of these pieces would be flush with the touch frame.
Alternate Design - Internal Computer
 If you are interested in an alternate design, utilizing a fully enclosed computer and the cabability to stand vertically as well as horizontally, you can look at this album.

